Tag Archives: chocolate

Old Fashioned Chocolate Pudding

P1040659Have you ever made-or eaten- homemade pudding? It is SO much better than the packaged mixes you may be accustomed to using. Sure, those mixes might save you a few minutes, but you’re loosing the rich but simple goodness that old-fashioned homemade pudding delivers. (Convenience foods almost always sacrifice taste, and add a lot of fake and undesirable ingredients.)

Maybe you don’t think of yourself as much of a pudding fan at all. I mean, isn’t pudding really just for throwing a cup of it into the kids’ lunchboxes? Isn’t it a bit outdated as far as desserts go? Well, I think you might be surprised by how elegant and pleasing this comforting dessert can be!

The pudding is thick, smooth, and plenty chocolatey! You can serve it as simple as just a dollop of whipped cream on top, or you could use it to create so many other delicious desserts. (that you just might see featured here, soon!) 🙂

Continue reading

Tips for Making the Perfect “Preacher Cookie”

P1040047Yes, the cookie with the most names. Many know it as the Preacher Cookie, we called them Fudgies  when I was growing up, some people call them No-Bake cookies, and my husband always called them Chocolate Oats– which is the name that has stuck with my family.

These are probably one of his very favorite things to eat ever- and my kids are right behind him. In fact, they “Chocolate-Oat” me to death! How about some variety, people? Nope- these are what they want.

So, seeing as I make these so frequently, I have discovered some tips that make these no-bake treats absolutely perfect.

Now, I know there are many different preferences when it comes to this popular cookie. But, I have found many versions end up sticky, or dry, or do not set properly.

In my world, the perfect Preacher Cookie will be:

P1030568

  • soft
  • fudgey
  • moist
  • glossy
  • set up in 10 minutes
  • still taste good the next day

So- here are some tips.

Continue reading

Homemade Chocolate Ice Cream (No eggs)

P1020687Confession: Ice cream is my downfall. I love, love, love it. My favorite way to end the day is to sit down on the sofa, cuddled in a blanket and a big bowl of ice cream in hand. I blame my father for this habit as he modeled this very routine to us children in our growing up years, night after night, bowl after bowl. And now, I (and my younger brother, too) are ice cream addicts- no small bowl will do- it must be large- a freezer with no ice cream in it is a very sad sight, indeed.

So- now that you now I am an ice cream addict, let’s move on and get to the point of this post!

I didn’t want to look at the ingredients of ice cream at the store. I just preferred to not KNOW what junk was in my ice cream. But, I did it anyway- and wasn’t really surprised when i saw the long list of weird and un-pronounceable ingredients. **sigh**.

So, I have begun to experiment with some different homemade ice cream recipes. I want to find several “go-to” recipes that I can use on a regular basis. And really- if the thought of homemade ice cream seems too involved, try to scratch that thought. It really is easy and does not take much time. All you have to do it mix up the ingredients, pour it in the ice cream maker’s canister. Then pour in ice and rock salt around it, plug it in, and the machine does the rest of the work. Your prep time for this recipe is 10 minutes maybe?

Also, this recipe does not have a custard base. I do want to try some of those in the near future, but this one is simply, cream, milk, sugar, cocoa. So, no cooking is involved, no tempering eggs. It’s quick, creamy, and delicious! You can clearly taste the creamy base. I also have not had a problem with this recipe becoming rock-hard in the freezer. Some homemade ice creams will do that. But this one has remained soft enough to scoop right out. The flavor reminds me a little bit of the taste of a Wendy’s frosty- in that it is not a real deep chocolate, but a lighter chocolate taste. We have loved it! And, of course, I have eaten more than I should! Don’t be like me!

Continue reading

Chocolate Chip Pie Bars

P1020999

What do you get when you cross chocolate chip cookies with Pie? Did I hear  someone say ‘Bliss’? ‘Perfection’?

Well, let me tell you- you’ll get flaky pie crust, gooey chocolate and a golden ‘cookie-like’ top that begs to be topped with vanilla ice cream.

Chocolate Chip pies are somewhat of a classic. Many people might associate them with the Kentucky Derby under the name of “Derby Pie“, which usually adds nuts. My first introduction to the pie was through my in-laws, using a Toll House version.

But, get ready…we’re switching it up again. My version is not a pie- We’ re making Bars! (and now we have a cookie turned pie turned bar!)

I actually prefer this bar version because it makes them easy to cut up into smaller pieces, they’re easier to pack up for lunches or snacks, and I could easily make a bigger batch for parties or family get-togethers and bake it all in a big baking dish, instead of needing multiple pie plates to shuffle around.

We liked them a lot! And so- here is my own version of this wonderful sweet treat!

Pie Crust: (this is my very favorite pie crust. I will have to post it separately sometime!)

  • 2 cups flour
  • 2 tsp. sugar
  • 1 tsp. salt
  • 2/3 cup canola oil
  • 3 tbs. milk

Filling:

  • 2 eggs
  • 1/2 cup flour
  • 3/4 cup brown sugar
  • 1/4 cup white sugar
  • 1/2 tsp. salt
  • 3/4 cup butter
  • 1 1/2 cups semi-sweet chocolate chips

Start with the crust. 

In a 9 in square baking pan, combine the flour, sugar, and salt.

P1020938

In a small bowl, combine the oil and milk and mix it really well with a fork.

P1020939

Pour the oil/milk into the flour mixture.

P1020940

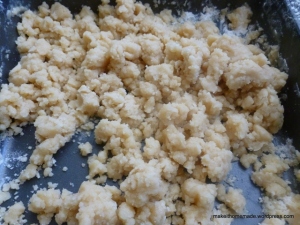
Using the fork, work to combine it. I usually end up getting my hands in there to finish working the flour into the wet mixture.

P1020943

Now press all of this into the pan bottom and just a little bit up the sides (not even half-way)

That’s all for the crust.

For the filling:

P1020947

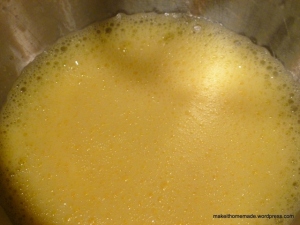
Beat the eggs in a mixer until they begin to become foamy. (I would say about 2 minutes on a high speed)

Add the flour, white sugar, brown sugar, and salt. Mix well

Add the softened butter. Beat until all combined and the butter is incorporated pretty well. (but don’t be surprised if you still see some little small chunks of butter)

P1020949

And finally, dump in the chocolate chips and give a little stir.

Bake at 325 for 1 hour. A knife inserted in the center should come out clean. (some chocolate will probably stick to the knife and the knife might seem kind of ‘oily’, but that is fine)

P1020966

Allow this to cool a bit before slicing into it. (I would give it a half hour)

You can serve this warm with vanilla ice cream on top. But I think it is also equally as good at room temperature.

I’ll let you decide which is better!

P1020999

A Good Brownie

P1020448There are a lot of opinions about what makes a good brownie. Some like it dense, some like it chewy, some like a cake-like version.

Personally, I like a chewy brownie that is somewhere in between dense and cakey.

I also usually prefer a no-frills brownie..you know, without all the new twists and turns that you see for brownies today that include fillings and layers and toppings. I guess there are times that some of those tempt my palette, but there is something to be said for an old-fashioned, plain, chocolatey, moist brownie all by itself. And that is what this is. Just a Good Brownie.

  • 1 cup packed brown sugar
  • 1 cup white sugar
  • 1 cup (2 sticks) butter, melted
  • 4 eggs
  • 1 1/2 tsp. vanilla
  • 1 cup flour
  • 1 cup cocoa
  • 1/2 tsp. baking powder
  • 1/2 tsp. salt
  • 1 cup semi-sweet chocolate chips (or your choice of chocolate)

Mix together white and brown sugar and melted butter. Add eggs one at a time. Add vanilla.

Sift together the flour, cocoa, baking powder, and salt. Add to the butter mixture and mix just until it is all incorporated. You don’t want to overmix- this will cause a drier brownie.

Finally, Add the chocolate chips and give it a light stir.

P1020414

Spread all that wonderful chocolate into a greased, 9×13 pan.

Bake at 350 (or 325 if you have a dark pan) for 25-30 minutes. (Mine took 30 minutes)

I think one of the most important tips for good brownies is that you only want to bake just until a knife inserted near the middle does not come out gooey. Don’t over-bake or you will have a dry and cakey brownie!! So, I suggest checking it at 25 minutes, and then if needed, add additional time. The less you bake, the more gooey and gummy it will be, and the longer, the more cakey it will become.

P1020445

Cocoa Sheet Cake with Fudgy Frosting

P1010868-001

I have been making this fudgy chocolate cake since I was a teenager, and it’s still a favorite of mine and the rest of my family, too. Even my dad, who is not a huge chocolate-lover, really enjoys this cake!

In addition to fulfilling your chocolate cravings, it is quick to prepare, the baking time is short, and you don’t have to wait for the cake to cool to frost it. And, speaking of the frosting, Oh my! I could lick spoon after spoon after spoon of that warm and chocolatey goodness!

COCOA SHEET CAKE:

1 cup butter or margarine

3 T. cocoa

1 cup water

2 cups flour

2 cups sugar

1 1/2 tsp. baking soda

1/2 tsp. salt

1/2 cup buttermilk (can also use sour cream)

2 eggs

1 tsp.vanilla

To begin, boil together the butter, cocoa, and water in a saucepan over medium-high heat stirring frequently constantly.

In a mixing bowl, mix together the flour, sugar, baking soda, and salt.

Pour the cocoa mixture over the dry ingredients. Beat until well combined

Add buttermilk, eggs, and vanilla.

Pour into a greased 15x10x1 jelly roll pan (like a cookie sheet with sides- the one I use for this is about 17x12x1)

Bake at 350 for 20-25 minutes- just until a knife inserted in the middle comes out clean.

Remove from the oven. Now start working on the frosting!

FUDGY CHOCOLATE FROSTING:

2 T. cocoa

1/2 c. butter or margarine

6 Tbs. milk

1 tsp. vanilla

1 lb. (approx 4 cups.) confectioners sugar

Boil together the cocoa, butter, and milk in a saucepan. Boil for 2-3 minutes- stirring constantly.

Remove from heat.

Add vanilla and powdered sugar.

Stir vigorously to fully incorporate all the powdered sugar.

The Frosting should be smooth and glossy.

Pour all the frosting over the still-warm cake. Spread to cover the whole cake.

Eat this warm with a tall glass of milk…. and then eat some more later when it’s cooled! Tastes great either way!