Monthly Archives: February 2013

CHALLENGE: What’s in Your Cart?

groceries


I have a Challenge for you! (details below) But first…some background…

As I have mentioned before, my family and I have been making many changes to the foods that we do (or do not) eat. We are working toward eating less and less packaged and processed foods and more and more fresh food. homegrown food, and homemade food.

Now, I do think a person can become overly-consumed with this concept- that is not my goal. And I know that I probably will not ever completely replace ALL our food consumption with only whole-foods. However, I want to do what I can.

I have had to ask myself “Am I really eating “healthy’ “? I always thought I prepared pretty healthy food for my family…that is until I started really looking at the ingredients in the foods I used. I have been very surprised. Now, I find myself more and more disgusted by all the non-food and JUNK that is in almost everything we eat!

Next time you go to the grocery store- look at the things that are in other’s carts. See how much of it is a packaged convenience food. I bet you’ll be surprised. Look in your OWN cart. I’ll bet you’ll be surprised. I know I was when I looked in mine!

It really is amazing and it really is sad, too. No WONDER people are sick all the time! No WONDER there are more and more people developing allergies that you used to only hear about occasionally. We are eating things that were never meant to be eaten!

What about you? What do you consider healthy?

We have all been conditioned to think if something is low-fat or low in sugar, it is healthy. If it is low in Weight Watchers points, it must be ok. We opt for fake sweeteners, bleached flour, MSG-flavored, etc etc for the sake of it being low-fat or “healthier’.

But, do you think it really is healthier?

I think it is time to re-think our food. Re-think what is healthy. Everyone will fall somewhere else on this spectrum. But, I think it is important to at least become aware of what is in the foods you eat. That is the first step. What you do with that knowledge is totally up to you.

So- here is the CHALLENGE:

take 1 grocery trip to glance at the ingredients of the foods that you are putting in your cart. ( I have been doing this and have been AMAZED at how many foods I have been buying and eating that I though were “OK”, but that are actually filled with junk. Here I thought I was making wise choices…until I stopped to look.)

So-

1. ACCEPT THE CHALLENGE, above

2. Come back to this post and comment on what you found

a. Were you surprised at the things you were buying?

b. Was there anything in particular that really surprised you?

3. Will you make some changes based on what you found, or do you think it doesn’t bother you and you will probably continue buying the same foods.

I look forward to hearing your feedback!

Soft Butter Biscuits

P1020368Biscuits are something I really love. You can whip up a batch, bake ’em, and have a plate full of hot golden biscuits in 15 minutes. They are simple, and they are a classic staple of southern kitchens (in which I am proud to be included!)

I have two biscuit recipes that I alternate between. Buttermilk Biscuits, and these wonderful Soft Butter Biscuits. The Buttermilk Biscuits I shared in a previous post, use canola oil and buttermilk as the fat and liquid. The biscuits I’m sharing with you today are more traditional- using butter and milk.

Here are some of the specs:

These biscuits have a wonderful soft and fluffy texture. They are very tender. The Tablespoon of baking powder that this recipe calls for causes the biscuits to rise nice and tall when baking- giving you a really beautiful product. And- most importantly- the buttery flavor is really great. Yum- Yum!

PRINTABLE RECIPE

  • 2 cups flour
  • 1 Tbs. sugar
  • 1 Tbs. baking powder
  • 1 tsp. salt
  • 1/2 cup butter (1 stick)
  • 3/4 cup milk

Combine the dry ingredients and give it a mix. (I did these in my food processor. Just pulse it a little to combine well)

P1020361

Cut the cold butter in 3 chunks and add to the flour mixture. Using a pastry blender, or pulsing in the food processor, cut the butter into the flour mixture until it all resembles coarse crumbs

Add milk and mix or pulse until a soft dough is just formed.

Turn onto a lightly floured surface and knead a few times. Pat down to desired thickness.

P1020364

Cut with a biscuit cutter and place on lightly greased baking sheet.

Bake at 450 for 8-10 minutes- or until starting to turn golden.

Remove and place on a wire rack. Serve Immediately.

P1020371PRINTABLE RECIPE

A Good Brownie

P1020448There are a lot of opinions about what makes a good brownie. Some like it dense, some like it chewy, some like a cake-like version.

Personally, I like a chewy brownie that is somewhere in between dense and cakey.

I also usually prefer a no-frills brownie..you know, without all the new twists and turns that you see for brownies today that include fillings and layers and toppings. I guess there are times that some of those tempt my palette, but there is something to be said for an old-fashioned, plain, chocolatey, moist brownie all by itself. And that is what this is. Just a Good Brownie.

  • 1 cup packed brown sugar
  • 1 cup white sugar
  • 1 cup (2 sticks) butter, melted
  • 4 eggs
  • 1 1/2 tsp. vanilla
  • 1 cup flour
  • 1 cup cocoa
  • 1/2 tsp. baking powder
  • 1/2 tsp. salt
  • 1 cup semi-sweet chocolate chips (or your choice of chocolate)

Mix together white and brown sugar and melted butter. Add eggs one at a time. Add vanilla.

Sift together the flour, cocoa, baking powder, and salt. Add to the butter mixture and mix just until it is all incorporated. You don’t want to overmix- this will cause a drier brownie.

Finally, Add the chocolate chips and give it a light stir.

P1020414

Spread all that wonderful chocolate into a greased, 9×13 pan.

Bake at 350 (or 325 if you have a dark pan) for 25-30 minutes. (Mine took 30 minutes)

I think one of the most important tips for good brownies is that you only want to bake just until a knife inserted near the middle does not come out gooey. Don’t over-bake or you will have a dry and cakey brownie!! So, I suggest checking it at 25 minutes, and then if needed, add additional time. The less you bake, the more gooey and gummy it will be, and the longer, the more cakey it will become.

P1020445

Pumpkin Pancakes

P1020351Pumpkin Pancakes are a yummy breakfast I like to make at least a couple times each fall when pumpkin is plentiful and usually on sale. But, somehow the fall season slipped by me this year without making these! So, the other morning, I surprised the kids by preparing them. My daughter just loves anything pumpkin, so these pancakes are always an anticipated treat for her!

The addition of pumpkin also revs up the nutritional value of the pancake since pumpkin is a great source of beta carotene, vitamin A and many other vitamins. I think the flavor combination of the pumpkin pancake and syrup is sooo good, too- quite an excellent duo!  

  • 1 cup flour
  • 1 Tbs. sugar
  • 1/2 tsp. cinnamon
  • 1/4 tsp. cloves
  • 1/4 tsp. nutmeg
  • 1 tsp. baking powder
  • 1/2 tsp. baking soda
  • 1/2 tsp. salt
  • 1 egg, beaten
  • 2 Tbs. canola oil
  • 3/4 cup milk
  • 1/2 cup (heaping) canned pumpkin (*canned pumpkin is an ingredient I don’t mind buying since it only contains pumpkin in the ingredients, without anything added! I use “Libby” brand.)

Mix the dry ingredients together. Add the beaten egg, oil, milk and pumpkin.

Mix until well combined.

Melt a little butter on a griddle.

Drop batter by 1/4 cup onto hot griddle and slightly spread them out a little bit.  (the heat should be between medium and medium-high. You want the pancakes to have a chance to cook in the middle, before the sides get too brown.)

This batter is a little more dense than a regular pancake batter. So, It might take a minute or two more than a traditional pancake would. When the bottoms are slightly brown, flip over and allow to brown on that side. (I would estimate each side taking 2-3 minutes, but just keep an eye on them)

Serve with syrup.

Chocolate Trail Mix Chunks

P1020336

These are a great little treat to have around the house. Instead of your traditional trail mix with nuts, dried fruit, and chocolate- this spins it around a little bit by melting the chocolate and creating a “trail mix candy”.


  • 2 cups semi-sweet chocolate chips
  • 1 cup milk chocolate chips
  • 1 heaping cup of peanuts
  • 1 heaping cup raisins
  • 3/4 cup flaked coconut


Melt the chocolate chips.

P1020319

Pour in the raisins, peanuts, coconut

P1020322

Stir until well-coated

P1020328

Drop by spoon-fulls onto waxed paper, foil, or a cookie sheet.

Allow to sit out for several hours, until the chocolate has hardened.

Store in an air-tight container. For a softer chunk, leave at room-temperature. For a firmer chunk, store in the refrigerator.

P1020338

Baked Brown Rice

P1020294I recently shared a recipe for Baked Rice- white rice, that is.  This time , I am sharing a recipe for Baked Brown Rice. The recipe if pretty similar, just slightly different measurements. It’s such a great, no-fuss way to prepare rice. In fact, baking rice is the only way I care to prepare it anymore. It’s just so easy, so little mess, and everyone here loves it.

  • 1 1/2 cups brown rice
  • 2 1/2 cups boiling water
  • 3 Tbs. butter
  • 1 tsp. salt (optional)

Lightly grease an 8in. baking dish.

Pour rice into the dish

Slice the butter into 4 or 5 pieces and place on top of the rice

As soon as your water is boiling, carefully pour over the rice.

Give it a little stir. Cover tightly with foil

Bake at 375 for 1 hour.

Cube Steak and Gravy

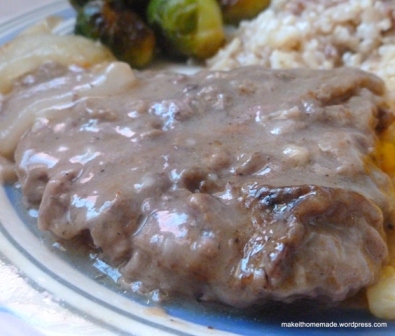
P1020309My husband and I raise a few cattle, and recently had a steer butchered. So, we now have a freezer full of beef, which is wonderful! I love eating clean beef that we raised!

So, I am looking for new beef recipes to add to my repertoire. Cube Steak is a cut I wanted to work on. I have only worked with cube steaks a few times, and have never loved the outcome- It’s a cut that tends to be tough and chewy. So, my mom suggested trying Cube Steaks baked in gravy- which is how she likes to make them.

Many tips from mom later, a wonderful dinner was created. The steaks were tender and bathed in a beautiful, bubbly, brown gravy. I was pleased, and Tim (my hubby) loved it! Will make this one again.

  • 4-6 cube steaks
  • flour
  • salt
  • pepper
  • cayenne pepper (optional)
  •  Oil
  • 2 Tbs. butter
  • water
  • onion (optional)

Pour a little oil (1- 2 Tbs) and 2 Tbs. butter into a frying pan. and heat on medium-high heat.

While the oil/butter is heating up, add some flour to a separate pan or bowl. Sprinkle in 1 tsp. salt and 1/4 tsp. pepper. Dredge the cube steaks in the flour, one at a time, and place in the frying pan.

P1020273

Brown on both sides on medium-high heat.

(you are not cooking these through. You are ONLY cooking until they are a little browned on both sides.)

Continue until you have browned all the steaks. (add a small amount more of oil/butter if needed)

Add these to a large baking dish.

Sprinkle with a very small amount of cayenne pepper, if you like a little spiciness. If not- just leave it out.

P1020277

If desired, you can slice up some onions and lay them over the steaks. This will add more flavor. But, if you don’t care for onions- this step is completely optional, as well.

Now, back to your frying pan. We are going to use the leftover meat drippings in the pan to make a gravy. There probably won’t be an abundance of meat drippings left over, but it will be enough to make a tasty gravy.

Start with a 1/2 cup of cold water. Add 2 large spoonfuls of flour and mix well with a fork. Add this to the pan that has the meat drippings. Stir with a wire whisk immediately. This should create a thick ‘paste’. Add another 2 cups of water. Now just whisk and whisk until the gravy begins to smooth out and thicken a little.

P1020275

Once slightly thickened, add another 1 1/2 cups of water, 1 tsp. salt and 1/4 tsp. pepper.  Allow to bubble and thicken again. Keep whisking frequently so the gravy does not burn.

Just a note: The gravy will not look very brown at this point, and it will not be as thick as a finished gravy- but that’s what it will turn into as it bakes!

Pour the gravy over the cubed steaks.

Cover tightly with foil and bake for at least 1 hour at 375. (I suggest baking for 1 1/2 hours)

For the last 10 minutes of cooking, uncover. This will help the gravy to thicken and darken to a beautiful, bubbly brown gravy.

P1020303

Remove from oven and serve! The cube steaks should be fully cooked and tender.

This is delicious alongside mashed potatoes  or brown rice. They hold the gravy really well!!

P1020305

Taco Meat with DIY Seasoning

P1020219

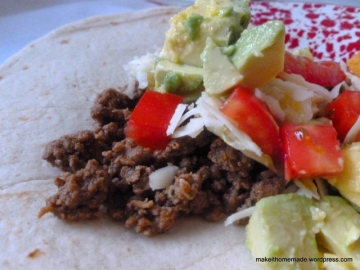
Tacos are a favorite weeknight meal in our home. It’s a meal that everyone is happy about- even my 2- year-old. In my early years of cooking, I always bought a package of taco seasoning to season the meat for tacos. But for years now I just make my own. In fact, I think this was one of the first items I quit buying and replaced with homemade. I don’t remember the last time I bought a packet.

It’s so easy and fast. It’s healthier.(Many packaged seasonings contain MSG and other chemicals and preservatives. See ingredients here.) And it is less expensive than buying a packaged seasoning mix every time. Try it out!

*The amounts of the spices could be less or more depending on your family’s tastes. But this is a good place to start.

  • 1 – 1 1/2 lb. ground beef
  • 3/4 c. water (if you prefer the meat to be “saucier”, increase to 1 cup)
  • 1 tsp. salt
  • 1/2 tsp. pepper
  • 1/2 tsp. chili powder
  • 1/2 tsp. garlic powder
  • 1 tsp. cumin

P1020213

Brown the ground beef. Drain. Return to the pan and add the water and seasonings. Stir.

P1020217

Allow to simmer on low for 10 minutes-Most of the water will be absorbed.

Serve with your other taco toppings.

P1020221

Shortbread Cookies with Chocolate Buttercream

P1020212

Two excellent recipes-  shortbread and buttercream- combine to make a very special cookie!

Forget the store-bought, processed shortbread cookies. You can easily make your own. These cookies are buttery, flaky, crispy- perfect shortbread!  Really, they are delicious all alone, but, to dress ’em up a bit, I added my favorite Chocolate Buttercream icing (which could be eaten by the spoonful instead of on a cookie!) I also think they turn out beautiful, and the recipe makes a lot of cookies, too!

  • 3 sticks of butter
  • 1 cup sugar
  • 1 1/2 tsp. vanilla
  • 3 1/3 cups flour
  • 1/2 tsp. salt

Beat the butter and and sugar in a mixer until fully combined. Add vanilla.

Add the flour and salt to the butter mixture and mix until a crumbly dough is formed.

P1020164 Divide into two balls and flatten each slightly on plastic-wrap. Wrap up and refrigerate for 25 minutes.

Take the dough out and starting with one of the sections of dough, gently roll out to about 1/4in thickness.

P1020166

Using a round biscuit cutter, cut out the dough. Use a metal spatula to transfer to an ungreased cookie sheet.

Bake @ 325 for about 18 minutes- just until starting to brown.

P1020172

Remove to a wire rack to cool.

Once the cookies are completely cool, we’ll add the chocolate buttercream!

CHOCOLATE BUTTERCREAM

  • 1 stick butter, softened to room temperature
  • 1/4 cup milk
  • 1/4 tsp. salt
  • 1 tsp. vanilla
  • 3 1/2 cups confectioners sugar
  • 6-8 T. cocoa
  • 2 T. margarine, softened
  • Dash of salt
  • Milk

Place 1 stick margarine, 1/4 c. milk, 1/4 tsp.salt, and vanilla in a large mixing bowl.

Cover with about 2 cups of confectioners sugar. Begin mixing slowly.

Add the other 1 1/2 cups confectioners sugar, and slowly mix until sugar is moistened. Increase mixing speed and mix until blended and fluffy. If the icing still looks too soft, you can add up to another 1/2 cup of sugar.

In a separate small bowl, mix the cocoa, 2 T. margarine, and dash of salt- it will just be crumbly.

P1020195

Add this to the prepared butter cream mixture and mix well.

P1020200

Add milk a Tablespoon at a time until frosting reaches spreading consistency (approx. 2 Tbs.)

Ice the cookies however you like.

P1020209

Hot Ham and Cheese Sandwiches with Sweet Mustard Sauce

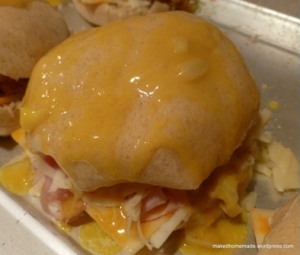
P1020193I adore these sandwiches. Definitely in my Top 3! Ham and Cheese is a classic, but this sandwich brings it up a notch.

A buttery, sweet mustard sauce is drizzled all over the inside and on top (my favorite part!)- the more the better, in my opinion! Also included is ham from the deli, and two types of cheese. Once again, I use Homemade Sandwich Buns, which I recently mentioned in another post. I cannot emphasize enough what a difference this makes! I made these sandwiches for years, with store-bought buns, and though I still really enjoyed them, I couldn’t believe how much better they tasted when made with a good homemade sandwich bun. Once assembled, all of this is baked until it is hot, saucy, and gooey with cheese!

Serve these with a salad or a baked potato or sweet potato, and you have a quick, easy, delicious meal! Makes 8 (NOTE: Make the buns a little smaller- and make these more like a “slider” for parties!)

  • 8 Sandwich Buns (I recommend Homemade Sandwich Buns)
  • 1/2- 3/4lb. fresh deli ham, very thinly sliced.
  • 8 slices colby-jack cheese
  • 1 1 /2 cups mozzarella cheese
  • 1/2 cup butter, melted
  • 2 (generous) Tbs. prepared yellow mustard
  • 2 Tbs. finely minced onion
  • 1 (generous) Tbs. sugar

P1020175

Assemble the sandwiches: colby-jack cheese on the bottom, then the ham, then the mozzarella cheese.

Next, mix together the melted butter, mustard, onion, and sugar. Drizzle this over the open sandwiches.

P1020186

Replace bun tops. Drizzle the rest of the sauce over the tops of the buns.

Bake @ 375 for 10 minutes- until all the cheese is melted.

P1020192