Monthly Archives: February 2013

Grandma’s Soft Molasses Crinkles

P1020123How do I love these cookies? Let me count the ways! Last week I mentioned my favorite cookie recipe, Peanut Butter Chocolate Chip Cookies, but these have to be next in line. Here’s why:

1. This was one of my Grandma Laury’s recipes. I love making recipes that were written out in her own hand. I find it special that I can enjoy something that she took the time to write down and keep and make.

2. They have a slight crunch on the outside, but are soft and chewy on the inside.

3. The flavor is just delicious- a warm and spicy taste- the stars being the molasses and ginger.

4. I think these cookies are just really pretty,too. The balls bake into the perfect little circles with ‘crinkles’ and sugar on top.

I have a very hard time stopping at 2 or 3 (or 4 or 5, actually- but don’t tell!!)

  • 2 1/4 cup flour
  • 2 tsp. soda
  • 1 cup light brown sugar
  • 1 tsp. ginger
  • 1 tsp. cinnamon
  • 1/2 tsp.nutmeg
  • 1/2 tsp. salt
  • 3/4 cup shortening
  • 1 egg
  • 1 tsp. vanilla
  • 1/4 cup molasses
  • Sugar (for coating the cookies)


Mix together the dry ingredients;
Add shortening-mix well.
Add egg and vanilla.
Add molasses.
P1020076
Chill for several hours or overnight;
P1020117
Form into small balls. Put some sugar in a small bowl. Roll the balls in sugar.
Place on cookie sheet (i get about 20 on a sheet)
Bake at 350 for about 10 minutes.
P1020131
Take out of the oven and allow to set up for about a minute- then remove from the pan onto a wire rack.
I get around 40 cookies

Slow-Cooker Shredded Beef Sandwiches with Mushrooms and Swiss

P1020114

This is such a good sandwich!  You have juicy shredded beef, sweet and buttery mushrooms and gooey Swiss cheese- all on top of a delicious bun. What’s not to like?


  • 3-4lb. sirloin tip roast
  • 1 T. extra virgin olive oil
  • 1 tsp. kosher salt
  • 1/4- 1/2 pepper
  • 1/2 tsp. crushed red pepper
  • 1/2 tsp. italian seasoning
  • 2 garlic cloves, minced
  • 1 onion, diced
  • 2 1/2 – 3. c. water
  • Buns (I suggest Homemade Sandwich Buns)

For the mushrooms:

  • 1 package sliced, white mushrooms
  • 1/4 c. butter
  • 1 cup liquid from the roast after it has cooked.

Place the roast in a crock pot. Rub with the olive oil. Sprinkle with salt, pepper, crushed red pepper, italian seasoning. Place diced garlic on top of the roast and sprinkle the onions on and around the roast. Pour the water in around the roast.

P1020064

Cover and cook on low for about 5-6 hours.

When your roast is done cooking, carefully remove it from the crock pot and place in a large bowl. Using two knives, pull the beef apart and shred it up.

Measure out 1 cup of the juices from the crock pot and set aside.

Return the shredded beef to the crock pot with the remaining liquid so that it soaks up that moisture.

Now, we are going to work on the mushrooms that will top the beef on the sandwich.

Pour the reserved liquid into a saute pan and add 1/4 cup butter. Give the mushrooms a rough chop and add to the saute pan with the liquid and butter. Turn to medium- medium/high heat and allow to boil.

P1020102

Continue to cook it until the liquid has thickened and cooked down and the mushrooms have darkened.

Now it’s time to assemble the sandwich. On a baking sheet, place the bottoms of the buns. Use tongs to lift some of the beef out of the crock pot. Allow some of the excess juices to drip off, and then place on the bun. Top this with some mushrooms. And top that with a slice of Swiss Cheese.

Place under the broiler in the oven just until the cheese melts.

P1020116

Replace the bun top and serve!

Homemade Sandwich Buns

P1020106This is a wonderful, wonderful recipe. I usually make these about once a week!

I have never loved any of the hamburger or sandwich buns I buy at the store. I think they are dry and not a lot of flavor. I kept finding myself disappointed. There had to be a better option!

Then, I found this recipe, and sandwiches and burgers have never been the same at our house!

I have found that a good, homemade bun makes all the difference in a sandwich! The bun goes from being simply something that holds the body of the sandwich, to competing as the star of the show.

We actually love having some buns left over, too, because they are excellent toasted for breakfast or for lunch or whatever. And, of course, an added benefit is that these buns won’t contain those chemicals and preservatives that the store-bought buns do. I use them all the time. We all love them!

Now, though I have made a few small changes in ingredients and some slight changes in the method, I do want to give credit where credit is due. I originally found this recipe from King Arthur Flour. So, if you would like to see their explanation, I have provided the link, above.

  • 1 cup warm water
  • 2 Tbs. butter- cut into slices
  • 1 large egg
  • 3 cups all-purpose flour
  • 1/2 cup wheat flour
  • 1/4 cup sugar
  • 1 tsp. salt
  • 1 heaping Tbs. instant yeast

I always make the dough in my bread machine, but if you like to use a mixer, that is fine, too. But, these instructions will be as I do it using the bread machine.

P1020067

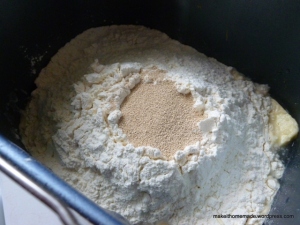
Add your ingredients. I always do wet ingredients first, then the dry, then the yeast.

So- water, butter, egg, salt, sugar, flours, yeast

Start the dough cycle. (which mixes the dough and allows it to rise)

When that cycle is completed, remove dough and pat onto a lightly floured cutting board.

P1020088

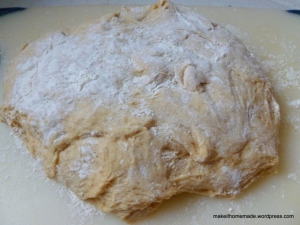
Using a sharp knife, cut 8 pieces. Shape these into buns by gently folding the corners under or making a sort of ball.

Place on a greased baking sheet.

P1020091

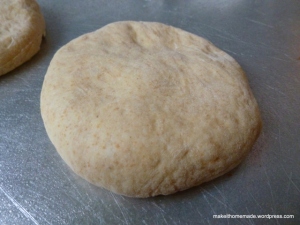
Gently press down on each bun to flatten slightly.

Allow to rise for about 20 more minutes.

Bake at 375 for 8-10 minutes. Watch to be sure the bottoms don’t get too done.

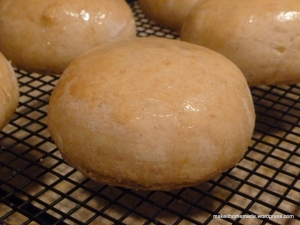
Remove from oven to wire rack.

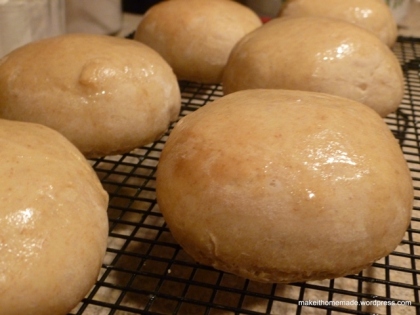
Melt 2 Tbs. butter and brush on the tops of the buns.

Allow to cool.

P1020103

Whipped Cream

P1010984If you are used to always using Cool Whip for a topping on desserts instead of real whipped cream, you are missing out on a real treat.

It was not until a few years ago that I had that “light- bulb in the brain” moment when i realized I could be making my own whipped cream instead of grabbing it out of the store freezer.

Once again, I was simply relying on a packaged food because it was just what I was used to doing.

Now, I almost always make my own whipped cream, and it’s so EASY! It’s just 2 ingredients, and it is SO SO SO much better! It’s much thicker, much creamier, and much richer!

The ratio is 1 Tbs. sugar per 1/2 cup of heavy whipping cream. So, it is very easy to halve or double the basic recipe depending on how much you need.

For 1 typical recipe, the amounts are as follows:

1 cup heavy whipping cream

2 Tbs. sugar

P1010982

Whisk in large, chilled mixing bowl until stiff peaks form. (this means that when you lift your whisk out of the cream, the ‘peaks’ will stay in position, and not fall over) It should be thick and no longer runny. Store in a covered container until ready to serve.

P1010995

Brown Sugar Sweet Potato Bake

P1010950

One of the comforting smells in our kitchen during the fall and winter months  is Sweet Potatoes!

This is a wonderful sweet potato side dish that is easy to prepare and delicious to eat! While the inside is velvety-smooth, the topping is sweet and crisp.

The ingredients are few in number and very simple, and the amounts of sugar and butter are less than in a traditional sweet potato casserole! I like to allow the natural sweetness of the potato to speak for itself in the filling- only adding some milk for fluffiness, and butter and salt for a contrast to the sweetness. Then, the topping is simply brown sugar- nothing else- but, boy is it good! It creates a caramelized crusty top to bite into.  Yum..Yum..Yum!!

3 large sweet potatoes

3 T. milk

3 T. butter

1/4 tsp kosher salt

2/3 c. brown sugar

Run water over the sweet potatoes and rub to clean.

Wrap each in foil

Place in oven, heated to 375. Bake for 1 hour

After the hour, check sweet potatoes for tenderness. If tender, Unwrap, and allow to cool slightly- just a couple minutes.

Cut the potatoes in half (length-wise). Scoop out the flesh with a spoon and place in a mixing bowl.

Add to your mixing bowl, 3 T. milk, 3 T. butter cut into small chunks, and 1/4 tsp. kosher salt.

Mix until smooth and fluffy. (If needed, add a little more milk- 1 Tbs. at a time, to reach a smooth texture)

Spoon into a greased 8in baking dish- or similar sized dish.

P1010937

Now, all you have to do is sprinkle on 2/3 cup of brown sugar.

Bake at 400 for 20 minutes or until top is slightly bubbly.

Remove and allow to cool for a few minutes before serving, so the brown sugar topping is nice and crispy.

Serves 4-5

P1010945

Light & Tender Buttermilk Biscuits

P1010891

Biscuits! They’re great for sopping up sausage gravy, they’re good alongside eggs and bacon, and they are excellent with butter and honey! Biscuits should be light, fluffy, and hot!

I have 2 biscuit recipes that I alternate using. But, this recipe is what I use most. Something that makes these unique, is that instead of using shortening or butter, like most biscuit recipes, this one uses canola oil- eliminating the usual “cutting in” process of the shortening, which also makes them a little quicker to prepare.

Most importantly- they’re just really good. So, let’s make some Light and Tender Buttermilk Biscuits!

2 cups all purpose four

4 tsp. baking powder

1/2 tsp. baking soda

1/2 tsp. salt.

1 cup buttermilk

1/3 cup canola oil

P1010872

Mix dry ingredients together in a mixing bowl.

P1010876

In a separate bowl, mix together the buttermilk and oil. Add this to the dry mixture- and blend just until everything is moistened.

P1010877

Knead slightly on a floured surface by folding in half and pressing it down a little bit.

Pat out to desired thickness. (I never pat mine too thin. I like a nice thick biscuit!) Don’t overwork the dough….the more you work it, the less tender your finished product will be

Cut with biscuit cutter. Place on a lightly greased cookie sheet.

P1010884Melt 1 T. butter. Brush onto each biscuit (This is totally optional…Sometimes I do this and sometimes I don’t. They will turn out great either way.)

P1010888

Bake at 450 for about 8-9 minutes. Don’t over-bake! Watch them. When they get a little golden on the top and the bottoms are light brown- take them out. Serve Hot! Biscuits are always best when they are piping hot! Slather with butter and honey or jelly!

Cocoa Sheet Cake with Fudgy Frosting

P1010868-001

I have been making this fudgy chocolate cake since I was a teenager, and it’s still a favorite of mine and the rest of my family, too. Even my dad, who is not a huge chocolate-lover, really enjoys this cake!

In addition to fulfilling your chocolate cravings, it is quick to prepare, the baking time is short, and you don’t have to wait for the cake to cool to frost it. And, speaking of the frosting, Oh my! I could lick spoon after spoon after spoon of that warm and chocolatey goodness!

COCOA SHEET CAKE:

1 cup butter or margarine

3 T. cocoa

1 cup water

2 cups flour

2 cups sugar

1 1/2 tsp. baking soda

1/2 tsp. salt

1/2 cup buttermilk (can also use sour cream)

2 eggs

1 tsp.vanilla

To begin, boil together the butter, cocoa, and water in a saucepan over medium-high heat stirring frequently constantly.

In a mixing bowl, mix together the flour, sugar, baking soda, and salt.

Pour the cocoa mixture over the dry ingredients. Beat until well combined

Add buttermilk, eggs, and vanilla.

Pour into a greased 15x10x1 jelly roll pan (like a cookie sheet with sides- the one I use for this is about 17x12x1)

Bake at 350 for 20-25 minutes- just until a knife inserted in the middle comes out clean.

Remove from the oven. Now start working on the frosting!

FUDGY CHOCOLATE FROSTING:

2 T. cocoa

1/2 c. butter or margarine

6 Tbs. milk

1 tsp. vanilla

1 lb. (approx 4 cups.) confectioners sugar

Boil together the cocoa, butter, and milk in a saucepan. Boil for 2-3 minutes- stirring constantly.

Remove from heat.

Add vanilla and powdered sugar.

Stir vigorously to fully incorporate all the powdered sugar.

The Frosting should be smooth and glossy.

Pour all the frosting over the still-warm cake. Spread to cover the whole cake.

Eat this warm with a tall glass of milk…. and then eat some more later when it’s cooled! Tastes great either way!

Basic Mashed Potatoes

P1010847

This is just a simple recipe for your basic, smooth & fluffy Mashed Potatoes- nothing dressed up. And really, mashed potatoes are always a star all by themselves. No need to add a lot of extra ingredients to make them special. So, grab a spoon a dive in!

4-5  large russet potatoes or 6 medium size

Salt for Seasoning

1/4-1/2c. milk

1/4 c. butter

Peel the potatoes with a vegetable peeler. Cut into chunks. Cover with cold water until you are ready to bring to a boil. (this keeps your potatoes from getting black spots)

Bring Water to a boil. Sprinkle in a little bit of salt to add flavor (approx. 1/2 tsp)

Continue boiling for 15-20 minutes. After 15 minutes, check the potatoes for tenderness with a small knife. When there is no resistance and the knife easily pokes through the potato, it is done.

Carefully drain the water from the potatoes

Move the potatoes to a large mixing bowl.

Add 4 Tbs. butter

Add 1/4 c. milk for starters.

Begin to beat with a hand mixer- working your way around the bowl with the beaters. Continue to add milk a little at a time until the mashed potatoes reach your desired consistency.

Transfer to a serving bowl and dot with butter.

Will Serve 4-6

Loaded Salsa Chicken and Rice

P1010796Talk about a super easy meal! This is it! Prepare your chicken in the crock pot or in the oven- works either way. I actually prefer the crock pot for this one because the chicken gets so tender and stays so very moist. But, whatever you choose, you can have fun with this dinner and all the toppings. Personally, I think the cool and creamy sour cream and avocado are what make this dish complete! The salsa from the chicken soaks into the rice and once all is added on top, you have a beautiful plate of deliciousness! I could eat a whole lot of this, especially on a cold night when I want to warm up with a good dinner, only reason I do not is that it’s so filling! Hope you enjoy it!

3-4 Boneless Skinless Chicken Breasts

1 16oz Jar Herdez Salsa- I like to use this brand because it uses very limited ingredients in it- no preservatives

1 recipe of Baked Rice, prepared and hot

Black Beans

Sour Cream

Avocado, sliced

Sharp Cheddar Cheese, grated

Option 1: (preferred for more tenderness) Place chicken breasts in the crock pot. Pour 3/4 of your jar of salsa over the chicken. Cook on low for about 4-5 hours. Chicken should be tender. (Test a piece to be sure the juices inside run clear..no pink!)

Option 2:  Place chicken breasts in a roasting pan.. Pour 3/4 of your jar of salsa over the chicken. Cook, covered at 375 for 1 hour. Chicken should be tender. (Test a piece to be sure the juices inside run clear..no pink!)

Now, with two knives, shred the chicken.  Pour back in with the salsa and stir to thoroughly coat. Pour this mixture in a serving dish.

Here is how you build the dish:

Spoon Rice on your plate, Top with the salsa chicken, then top with black beans, corn, cheese, sour cream and avocado. ( or whatever combination of those that you prefer!)

Baked White Rice

P1010782Rice is popular here in our house- it is something that all my kids like a lot. So, I make it often. BUT, I always hated to prepare rice! It just never seemed to turn out the way I like it, and it always made a mess on my pots. Maybe I just wasn’t doing it right, but I tried several different ways and just was never satisfied. So, I was SO thrilled to try out a recipe very similar to this one that only required you to bake the rice. I tweaked it a little and now use this recipe all the time to serve alongside other dishes. Baking the rice also allows me to put it in the oven, and then my part is done, Best of all. it comes out perfect every time.

2 cups white rice

5 cups water

1 tsp. kosher salt

1/4 c. butter, cut into chunks

Bring Water to a boil

Pour Rice into a lightly greased 9x 13 baking dish

When water is boiling, slowly and carefully pour over the rice.

Mix the rice a little make make sure it’s evenly distributed

Sprinkle with the salt

“Dot” your rice with the butter

Cover tightly with foil

Bake at 350 for 45 minutes to 1 hour (until all the water is absorbed)